You need QuickBooks Desktop running today, without risking a company file or chasing sketchy downloads. This guide gives you the exact, official path for both Windows and Mac, plus clear fixes when something blocks the installer.
This guide is written for CPAs, bookkeepers, and firm admins who want a clean, supported install the first time. You’ll download only from Intuit’s Downloads & Updates page, install with the right options for single- or multi-user, activate with your product and license, open or move a company file, and follow platform-specific steps for Windows and macOS. No mirrors, no risky tweaks, just the official method.
Table of Contents Show
TL;DR
- Download: Use Intuit’s Downloads & Updates. No mirrors.
- Windows Installation → run as admin, choose Custom and Network Options, pick the right role.
- Mac Installation → drag app to Applications, open.
- Activate: Help → Activate (Windows) or QuickBooks → Register (Mac). Find license via F2 or CAMPs.
- Data: Work with .QBW/.QBB. Use Migrator Tool to move PCs. Convert when switching Windows ↔ Mac.
- Multi-user: Windows → Database Server Manager on the server, host only on server, scan the file folder. Mac → Enable Multiuser Mode on the same LAN.
- Fix fast: Tool Hub → Install Diagnostic Tool for 1603/1904. For H-errors, ensure server hosting, rescan, and services running.
Download QuickBooks Desktop (Windows and Mac)
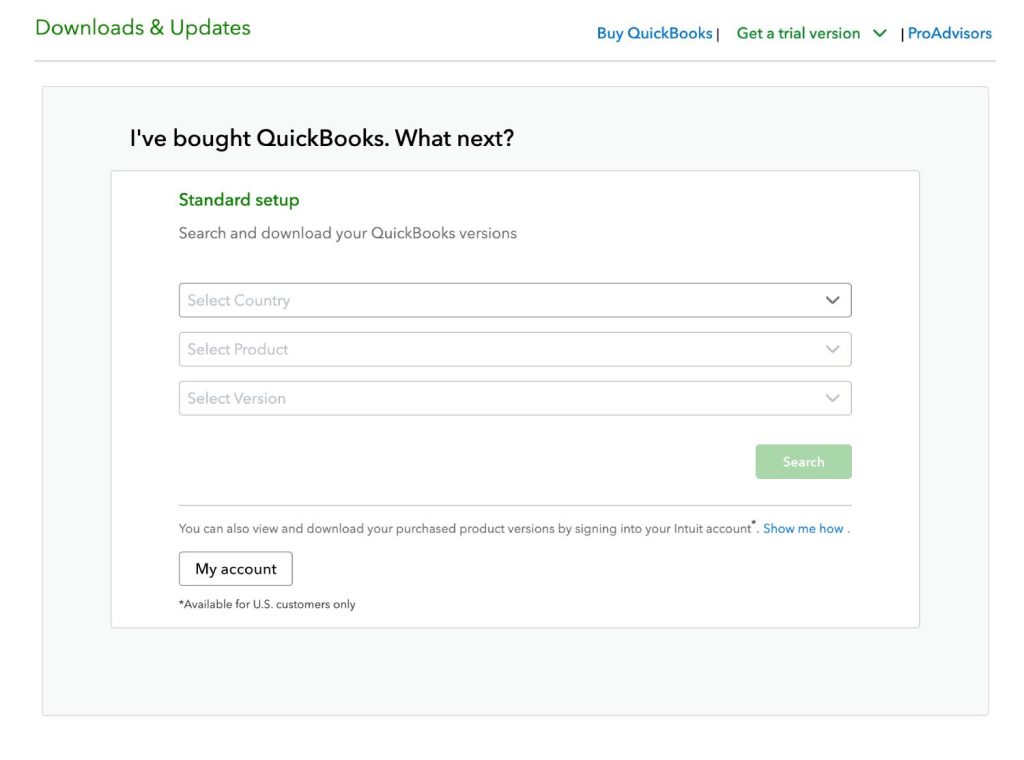
Use only Intuit’s official download path. Everything starts at the Downloads & Updates page, which serves Windows and Mac alike. Select your country, product edition (Pro, Premier, Enterprise, or Mac Desktop), and the year, then download the installer to your computer. Do not use mirrors or third-party links.
Windows: get the correct installer
- Go to Downloads & Updates.
- Choose your Country, Product (for example, Desktop Pro, Premier, or Enterprise), and Version (year, such as 2024/2026).
- Select Search, then Download and save the file locally. If you also need the latest maintenance release, install the update after setup.
If you can’t find your license or installer: sign in to CAMPs (Customer Account Management Portal) to view your purchases, product and license numbers, and direct downloads tied to your account.
Supported Windows at a glance: current QuickBooks Desktop releases run on Windows 10 or Windows 11 (64-bit). Keep Windows updated for a smooth install and activation.
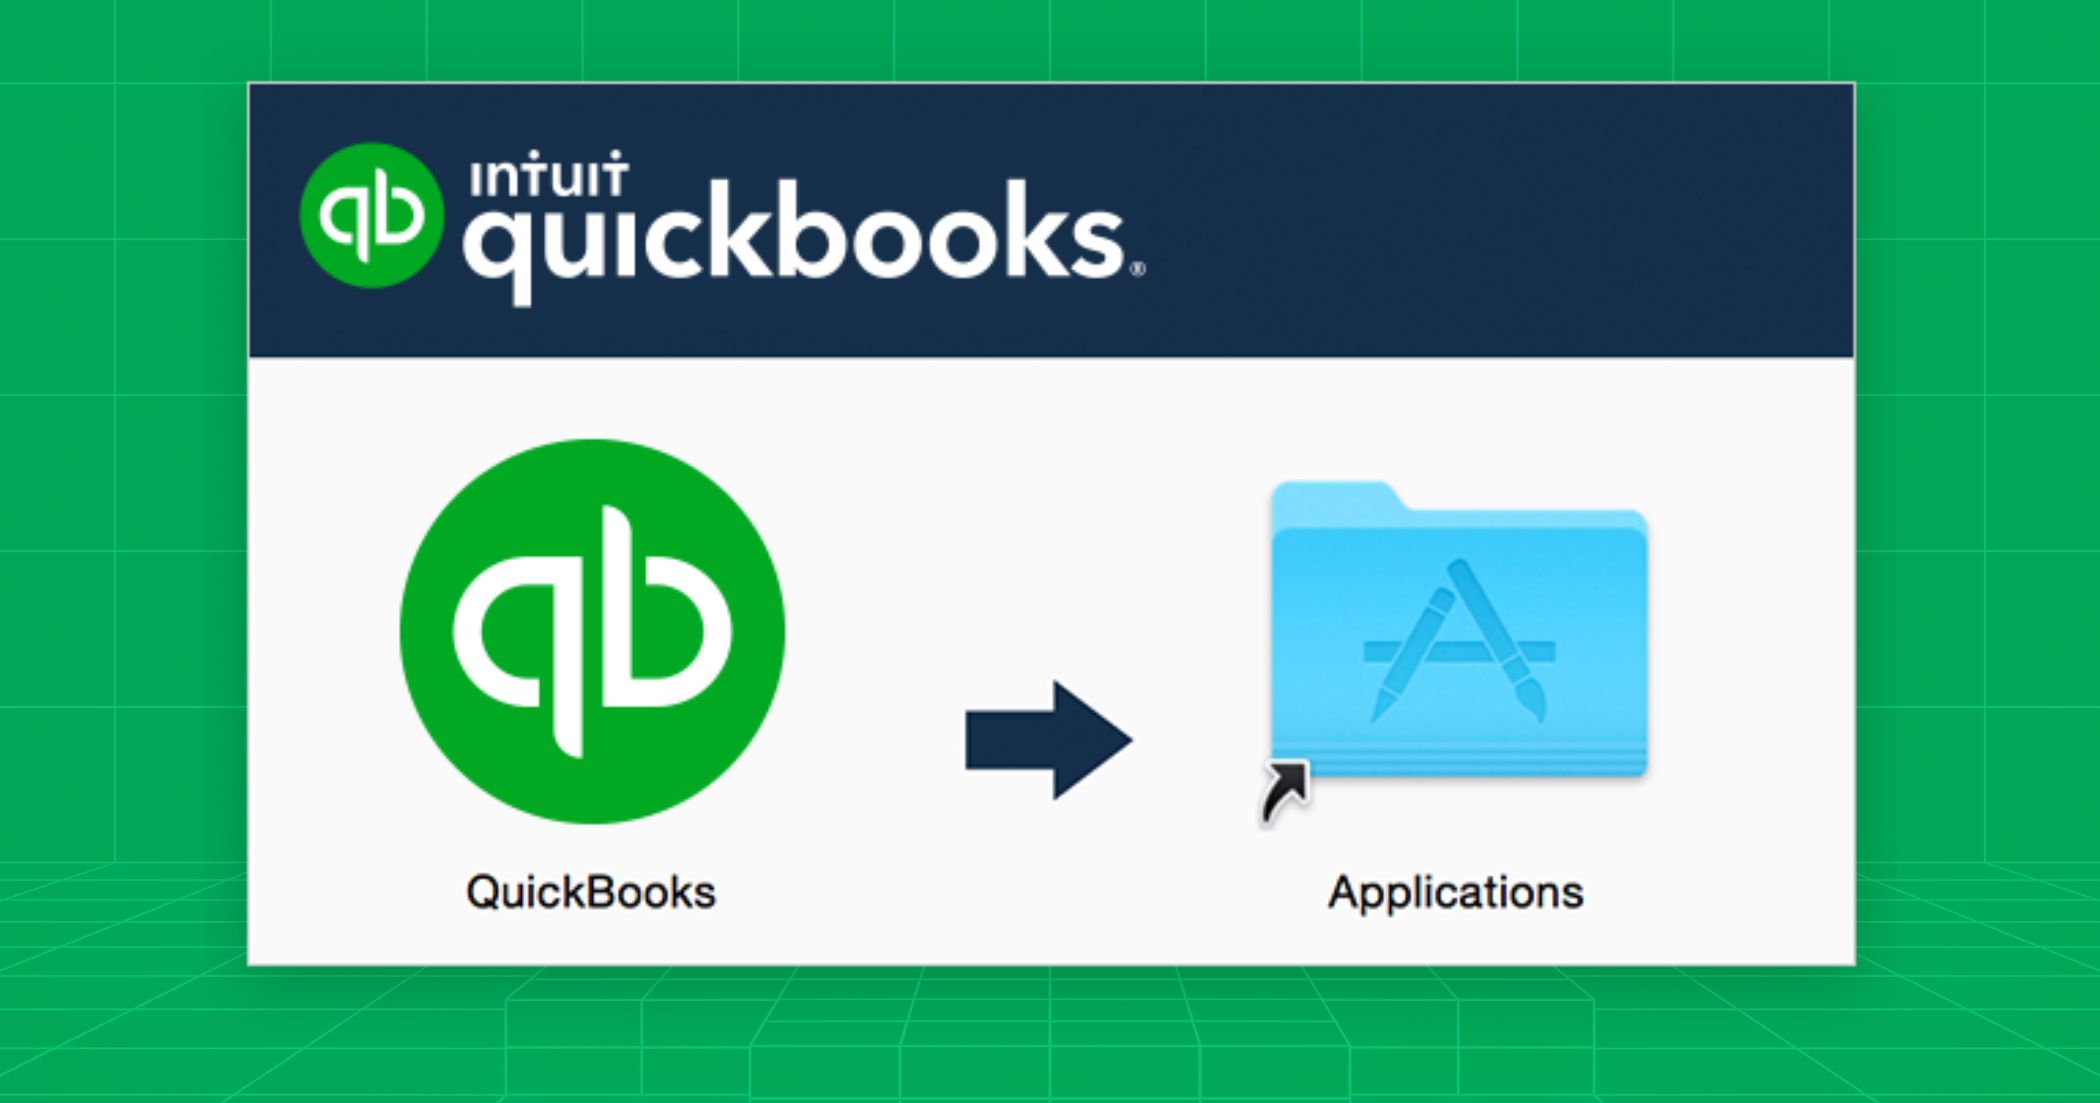
Mac: download the Mac Desktop build
- Go to Downloads & Updates and select QuickBooks Mac Desktop with your year.
- Download the .dmg installer.
- Close other apps, open the .dmg, then drag the QuickBooks icon into Applications. You’ll activate on the first launch.
Multi-user note for Mac: QuickBooks Desktop for Mac supports multi-user. You’ll enable it from the host Mac and invite users after install; details are later in this guide.
Before you begin: quick checklist
- Admin rights: sign in with an administrator account on the machine where you’re installing.
- License info ready: have your product and license number or access to CAMPs.
- Stable internet: needed for download, activation, and updates.
- If using multi-user: decide the host machine and where the company file will live before you install.
Why this path is safest
Intuit’s Downloads & Updates page maps your exact edition and year to the correct installer and update stream. It also avoids mismatched builds that cause activation failures or patching issues later. If anything blocks installation on Windows, you can use QuickBooks Tool Hub after download to repair Windows components before retrying.
Install on Windows
A clean Windows install takes a few minutes if you choose the correct role for this computer. Follow these steps exactly and stick to Intuit’s defaults unless your IT policy requires a different install path.
1) Start the installer
- Locate the installer you downloaded and open QuickBooks.exe.
- Accept the license agreement and select Next.
- When prompted for install type, select Custom and Network Options, then Next. This exposes the workstation or server roles you need for single- or multi-user setups.
2) Choose how this computer will use QuickBooks
On the “Custom and Network Options” screen, pick one of the following. This choice determines what gets installed and whether this machine will host company files for others.
- I’ll be using QuickBooks Desktop on this computer:
Use this for a normal workstation that opens company files stored locally or on a server share. - I’ll be using QuickBooks Desktop on this computer, AND I’ll be storing our company file here so it can be shared over our network:
Installs QuickBooks plus the Database Server Manager so other users can connect to the company file hosted on this PC. - I will NOT be using QuickBooks Desktop on this computer:
Installs Database Server Manager only. Choose this on a dedicated server that hosts the company file but won’t be used for day-to-day bookkeeping.
Keep roles clean: only the server should host multi-user access. Workstations should not host. This prevents multi-user conflicts later.
3) Select install location and complete setup
- On the location screen, you can accept the default path or choose Change the install location and Browse to a managed applications folder if your firm standardizes paths.
- Select Install to begin installation.
- When it finishes, select Open QuickBooks to verify launch on this PC.
4) If Windows blocks or the installer fails
- Use the QuickBooks Tool Hub and run Installation Issues → QuickBooks Install Diagnostic Tool, then restart Windows and retry the install. This resolves most missing Windows component problems.
5) Post-install checks for multi-user environments
- If this PC is the server, open QuickBooks Database Server Manager and scan the folder that holds your .QBW files. Scanning configures firewall rules so workstations can connect.
- On the server copy of QuickBooks, confirm File → Utilities shows Stop Hosting Multi-User Access (which means hosting is on). Do not enable hosting on workstations.
You’re done on Windows. Next, you’ll activate QuickBooks when prompted at first launch; if you prefer, we can cover macOS installation first and then activation for both platforms together.
Install on Mac
Installing QuickBooks Desktop for Mac is straightforward. You download the Mac build, drag it into Applications, then complete activation on first launch. Make sure your Mac meets Intuit’s current requirements (macOS 12 Monterey or later, Intel or Apple silicon).
1) Download and place the app
Download the QuickBooks Mac Desktop installer from Intuit’s Downloads & Updates page, then open the .dmg file. When the install window appears, drag the QuickBooks icon into the Applications folder. Open Applications and confirm the app is present.
2) First launch
Open QuickBooks from Applications. If macOS prompts you for permissions to access Documents, Desktop, Downloads, or network volumes, allow access so QuickBooks can read and write your company files. If the app does not open after the first attempt, restart the Mac and try again, then proceed to activation in the next section. For reference, Intuit’s Mac setup article walks through these first-run steps.
3) Keep QuickBooks current
After install, check for product updates so you’re on the latest maintenance release for your year. From QuickBooks for Mac, use the in-product update flow as described in Intuit’s update guide for Mac 2024 and newer.
4) Multi-user readiness on Mac
QuickBooks Desktop for Mac supports multi-user mode on a local network. After installation, you’ll enable sharing from the host Mac and then connect from other Macs on the same network. The enablement happens inside QuickBooks: sign in as the admin on the host machine, go to File, then select Enable Multiuser Mode. You can add users with distinct logins before you share the company file. We’ll cover full multi-user setup later; for now, confirm the host Mac can open the primary company file cleanly.
5) If installation stalls
If the .dmg won’t mount or the app won’t copy to Applications, close other apps, re-download the installer from Intuit, and repeat the drag-to-install process. Persistent issues are usually resolved by re-downloading or by updating macOS, then following Intuit’s Mac install steps again.
Activate QuickBooks Desktop
Activation links your license to your Intuit Account and completes setup after installation. If QuickBooks does not prompt you automatically, you can start activation from the Help menu at any time.
- Open QuickBooks Desktop.
- Go to Help → Activate QuickBooks Desktop.
- Sign in with your Intuit Account, or create one on the activation screen, then follow the prompts to verify your info.
Mac: register on first launch
- Open QuickBooks for Mac.
- From the QuickBooks menu, select Register QuickBooks.
- Enter your License and Product numbers, then choose to register online or by phone and follow the on-screen steps.
Find your product and license number
If you already have QuickBooks open, press F2 to display the Product Information window with your product number and license number. If you cannot access the app, sign in to CAMPs (Customer Account Management Portal) and select View details for your purchase to retrieve them.
Change or update a license on the same machine
If you entered the wrong license during setup or your firm reassigned seats, you can change it without reinstalling: go to Help → Manage My License → Change My License Number, enter the new number, and finish.
If activation fails
Most activation issues resolve with these checks:
- Confirm Windows date and time, then retry activation from Help → Activate QuickBooks.
- Make sure you have a stable internet connection and that security software is not blocking QuickBooks.
- If errors persist, follow Intuit’s activation troubleshooting guide for validation code and sign-in problems.
Open or move your company file
Your data lives in a .QBW company file. Backups use .QBB. Know which one you have before you open, restore, or move it.
Open an existing company file (Windows)
- Open QuickBooks Desktop.
- Go to File → Open or Restore Company.
- Select Open a company file, choose your .QBW, then select Open and sign in.
Restore from a backup (.QBB) (Windows)
- Go to File → Open or Restore Company.
- Select Restore a backup copy → Local Backup.
- Browse to the .QBB, choose a new folder to save the restored .QBW, and complete the restore. Avoid saving over your current file.
Move QuickBooks to a new Windows computer
Use Intuit’s Migrator Tool if you are a single user moving QuickBooks and up to three company files.
- On the old PC: File → Utilities → Move QuickBooks to another computer.
- Select I’m Ready, create the one-time password, and choose a USB drive.
- On the new PC: plug in the USB and follow the prompts to finish; if it doesn’t auto-open, start QuickBooks and follow the on-screen steps.
Alternative: move just the data folder
Find your company file path with F2 (Product Information), then copy the QuickBooks data folder to the new location or device and open it from there. Backups are the simplest way to move data safely.
Open or restore on Mac
- Open QuickBooks for Mac, then File → Open Company, select your company file and sign in.
- To restore a backup you created on Mac, open the .QBB in QuickBooks for Mac and follow the prompts. (If you receive a prompt about updating the file, let QuickBooks complete the update.)
Moving between Windows and Mac
QuickBooks for Windows and QuickBooks for Mac use different file formats, but you can convert in either direction using Intuit’s built-in tools.
- Windows to Mac: In Windows, open the file as admin and go to File → Utilities → Copy Company File for QuickBooks Mac to create a MAC.qbb. Move it to the Mac and open in QuickBooks for Mac. Review Intuit’s list of items that do not convert.
- Mac to Windows: In QuickBooks for Mac, go to File → Export → To QuickBooks for Windows, save the file, move it to the PC, then restore it in QuickBooks Desktop for Windows.
If you can’t open the file
Start by copying the .QBW to your desktop and opening it from there. If it opens, move it back to a healthy folder and update your shortcuts. Use Intuit’s guide for files that won’t open.
When you upgrade QuickBooks to a new year
Opening an older .QBW in a newer QuickBooks Desktop will prompt you to update the company file. Make sure all users are signed out, keep a .QBB backup, open the new QuickBooks, then File → Open or Restore Company → Open a company file and follow the update prompts. For hosted or server setups, Intuit recommends moving the file locally for the update, then returning it to the share.
Multi-user note
If the file will be shared, keep it in a dedicated server folder and scan that folder with Database Server Manager so Windows firewall rules are set correctly for workstations.
Set up multi-user access
Multi-user mode lets several people open the same company file at the same time. The setup is different on Windows and Mac. On Windows, you use QuickBooks Database Server Manager on the host. On Mac, you enable multi-user inside the app and keep all Macs on the same local network.
Windows: set up with Database Server Manager
What you need first
- A computer to act as the server that stores the company file and stays on during work hours.
- QuickBooks Desktop installed on the server and on each workstation, with the same year or a compatible mix for your licenses.
- Windows admin permissions on the server.
A. Install and configure Database Server Manager on the server
- On the server, run QuickBooks setup and choose Custom and Network Options. Pick the server role that stores the company file so it can be shared. This installs QuickBooks Database Server Manager.
- Open QuickBooks Database Server Manager and Scan the folder that holds your company file. The scan sets Windows firewall permissions for QuickBooks automatically.
- Make sure the server is hosting multi-user access. In QuickBooks on the server, go to File → Utilities and confirm you see Stop Hosting Multi-User Access. If you see Host Multi-User Access, turn it on.
- If you restrict firewall rules, follow Intuit’s guidance to allow QuickBooks services or re-scan folders. Avoid manual port edits unless required by IT policy.
B. Prepare Windows services and permissions
- Confirm the background services are healthy on the server.
The QuickBooksDBXX database service and QBCFMonitorService should be running. If either fails to start, Intuit’s service articles walk through turning on hosting and configuring services. - Ensure the Windows user that the database service creates,
QBDataServiceUserXX, has permission to the company-file folder. This account is added during server-manager install for each year you host.
C. Connect workstations
- Install QuickBooks Desktop on each workstation.
- In QuickBooks, select File → Open or Restore Company, browse to the server share, select the .QBW, and check Open file in multi-user mode when prompted.
- Test by opening the file from two different workstations and switching to multi-user mode. If you get an H-error, use the steps below.
Quick test checklist
- Server shows Stop Hosting Multi-User Access.
- Database Server Manager has scanned the company-file folder.
- Two workstations can open the same file at once without an H-error.
Mac: enable multi-user on the local network
QuickBooks Desktop for Mac supports multi-user on the same network. You cannot share a Mac company file with remote workstations over the internet using this feature.
Steps on the host Mac
- Open the company file on the Mac that will host it.
- Go to File → Enable Multiuser Mode. You should see a checkmark next to it.
- Other Macs on the same network can now open the shared company file. You can toggle back to single-user by selecting Enable Multiuser Mode again to clear the checkmark.
Notes
- All Macs must be on the same local network to access the shared file.
- If you need remote access from outside the office network, use a supported hosting solution instead of Mac multi-user.
Troubleshoot common multi-user errors on Windows
Start with the official tools
- Open QuickBooks Tool Hub → Network Issues and run the network repair. This launches Database Server Manager, lets you scan the folder again, and repairs firewall permissions automatically.
Fix H101, H202, H303, H505
- Verify hosting is on at the server and off at workstations.
- In Database Server Manager, Start Scan on the company-file folder to reset firewall rules.
- Confirm QuickBooksDBXX and QBCFMonitorService are running on the server.
- Reopen the file from the server’s UNC path and test multi-user again. Intuit’s H-error guide includes these steps and additional checks.
Firewall and security software
If you use strict firewall rules, follow Intuit’s allow-list guidance for QuickBooks or re-scan with Database Server Manager so rules are created for you. Avoid disabling antivirus.
When to escalate
If services fail to stay running, review Intuit’s service health article and repeat the hosting and service configuration steps. Persistent failures after tool-based repair often point to damaged services or permission conflicts that require IT review.
Result you want
- Server hosts.
- Database Server Manager has scanned the folder.
- Workstations open the same .QBW at the same time without H-errors.
Troubleshoot common install and launch errors
Start with safe, vendor-approved tools. Avoid registry edits or third-party “cleanup” utilities.
Windows: use Tool Hub first
- Install QuickBooks Tool Hub. Close QuickBooks, install Tool Hub, then open it.
- Installation Issues → QuickBooks Install Diagnostic Tool. Run it, restart Windows, and try the installer again. This repairs Windows components QuickBooks needs.
If QuickBooks installs but won’t open, try Tool Hub → Program Problems → Quick Fix my Program, then reopen QuickBooks.
Fix specific Windows install errors
- Error 1603 during install
Open Tool Hub → Installation Issues → QuickBooks Install Diagnostic Tool, let it complete, restart, update Windows, then rerun the installer. If it still fails, follow Intuit’s steps for Selective Startup. - Error 1904: file failed to register
Run Install Diagnostic Tool from Tool Hub, reboot, then retry the install. If a specific module is named, follow the file-specific steps in Intuit’s guide. - Repair a damaged install
If QuickBooks is installed but unstable, use Repair QuickBooks Desktop and then update to the latest release.
Windows: multi-user H-errors (H101, H202, H303, H505)
This means something is blocking the workstation-to-server connection. Do this in order:
- Ensure hosting is on only at the server and off at all workstations.
- In QuickBooks Database Server Manager, Scan the folder that holds your company file to reset firewall permissions.
- Confirm the Windows services QuickBooksDBXX and QBCFMonitorService are running on the server.
- Reopen the file from the server’s UNC path and test multi-user again. Intuit’s H-error articles walk through these steps.
When your company file won’t open (Windows)
If a company file opens slowly or won’t open, update QuickBooks, try opening a sample file, move the file to a local folder, and run File Doctor from Tool Hub to repair file and network issues.
Mac: common fixes
- Re-install cleanly. Close all apps, re-download the QuickBooks Desktop for Mac installer from Intuit, open the .dmg, then drag QuickBooks into Applications and launch from there.
- Grant permissions on first launch. When macOS prompts for access to Documents, Desktop, Downloads, or network volumes, allow access so QuickBooks can open and save your company files.
- Multi-user limits. QuickBooks Desktop for Mac shares files only on the same local network. Enable from File → Enable Multiuser Mode on the host Mac; for remote access needs, use a supported hosting solution.
- Company file won’t open on Mac. Try opening a recent backup, then contact Intuit if errors persist.
If issues persist
Re-run Tool Hub diagnostics on Windows, confirm OS updates, and verify you’re using the correct year’s installer. For complex service or permission failures in multi-user setups, follow the full Install QuickBooks Desktop and Database Server Manager guides step by step.
Local install vs hosting in the cloud
Both options work. The right choice depends on how many people use QuickBooks, where they work, and how much IT help you have.
When a local install is fine
- One office, a few users, and a reliable local network.
- You are comfortable managing Windows or macOS updates, backups, and permissions.
- Files live on a single workstation or a simple on-prem server that stays on during work hours.
- Remote access is rare, or you already use a private VPN and it is stable.
When hosting is the better fit
- You need secure access from multiple locations or from home without managing VPNs.
- You want central backups, version control, and quick recovery if a PC fails.
- You run multi-user all day and want consistent speed without peer-to-peer hiccups.
- You prefer managed patching and monitoring so Windows updates do not interrupt work.
If you prefer to run QuickBooks Desktop from any device with your team, Verito hosts QuickBooks on dedicated private servers with 24/7 support and daily backups.
Learn more about QuickBooks hosting.
Verito’s platform is built for tax and accounting firms that value speed, uptime, and compliance, so install tasks do not turn into lost billable hours.
Notes for Mac users
- QuickBooks Desktop for Mac supports local multi-user on the same network.
- If you need anywhere access from Macs, host the Windows edition of QuickBooks Desktop in the cloud and connect from macOS using a secure client.
- If your firm relies on Mac-only features, keep the Mac edition local, or plan a clean move of the company file to the Windows edition before hosting.
FAQs
1. Which operating systems does QuickBooks Desktop support?
Current QuickBooks Desktop releases support Windows 10 and Windows 11 64-bit on workstations. For Windows Server in multi-user environments, supported versions vary by year but commonly include Server 2016, 2019, and 2022. QuickBooks Desktop for Mac is available for recent macOS versions on Intel and Apple silicon. Always confirm the exact version list on Intuit’s site before upgrading your OS.
2. Where do I find my product and license number?
Inside QuickBooks, press F2 to open the Product Information window. If the software is not installed or you do not have access to the machine, sign in to CAMPs (Intuit’s Customer Account Management Portal) to view your purchases and retrieve your product and license numbers.
3. What is the difference between Express and Custom and Network Options during install?
Express installs QuickBooks for a single computer with default settings. Custom and Network Options lets you choose how the computer will use QuickBooks: as a workstation only, as a server that also runs QuickBooks, or as a server only that installs Database Server Manager for multi-user access. Use Custom and Network Options for any shared or multi-user setup.
4. How do I move QuickBooks to a new computer without breaking anything?
On Windows, use the Migrator Tool: on the old PC go to File → Utilities → Move QuickBooks to another computer, create the one-time password, copy to a USB drive, then run it on the new PC and activate. On Mac, install QuickBooks for Mac on the new machine, then move the company file or restore from a .QBB backup. Always keep a fresh backup before you move.
5. How do I fix install errors 1603 or 1904 on Windows?
Install QuickBooks Tool Hub, then run Installation Issues → QuickBooks Install Diagnostic Tool. Restart Windows, update the OS, and run the installer again. This sequence repairs common Windows components that block QuickBooks setup.
6. How do I set up multi-user mode on Windows and Mac?
On Windows, install Database Server Manager on the host, scan the folder that holds your .QBW, confirm the server is hosting, then open the file from each workstation in multi-user mode. On Mac, open the file on the host Mac and choose File → Enable Multiuser Mode, then connect from other Macs on the same local network. For remote access needs, consider hosting rather than peer-to-peer sharing.
Conclusion
Installing QuickBooks Desktop is straightforward when you follow the official path: download from Intuit’s Downloads & Updates page, choose the correct install role, activate with your product and license number, and open or move your company file with care.
On Windows, use Custom and Network Options so you assign the right role for each machine.
On Mac, install from the .dmg into Applications and complete registration on first launch.
For multi-user, keep hosting on the server only, scan the company-file folder with Database Server Manager, and confirm services are running before you put the file into daily use.
If something blocks setup or QuickBooks will not launch, start with Tool Hub. The Install Diagnostic Tool solves a large share of Windows component issues without risky workarounds. When files fail to open, restore from a recent .QBB or copy the .QBW locally to rule out network problems. Keep your license information accessible in CAMPs, apply product updates regularly, and make verified backups part of your routine.
With these steps, most firms can complete a clean, supported installation in one sitting and avoid the common pitfalls that cost time during a busy season.